
Auto-Charge
What is auto-charge?
Auto-charge (or Autocharge) is a mechanism that allows a vehicle to automatically start a charging session as soon as it is plugged into a charging station.
This feature relies on the automatic identification of the vehicle, without the need to use a badge or manually interact with the charging station's interface.
This charging mode is particularly well suited to corporate fleets, where vehicles must be able to charge autonomously while still being identified individually.
How auto-charge works
When the vehicle is plugged into a DC fast charger with a Combo CCS connector, it automatically sends its MAC address via the standardized communication protocol.
This MAC address is transmitted to the Chargekeeper supervision platform as part of the OCPP Authorize command.
The supervision platform interprets this MAC address as a virtual badge, and checks whether the vehicle is indeed authorized to charge.
If the vehicle is recognized and authorized on the charging station, the charging session starts automatically.
Differences with open-charge mode
Although the behavior of auto-charge resembles open-charge mode, the differences are significant:
| Feature | Open-charge | Auto-charge |
|---|---|---|
| Authentication | None | Relies on vehicle identification |
| Security | Free charging | Charging controlled via MAC address |
| Identification | Not tied to a specific user | Unique identification of the vehicle |
| Session tracking | Anonymous | Sessions attributed to a vehicle |
Technical compatibility
- Protocol: OCPP 1.6 JSON
- Compatible chargers: only DC chargers with a Combo CCS connector
- Supervision: Chargekeeper
Auto-charge identifier format
The vehicle identifier is transmitted in the form of a virtual badge, in the Authorize command of the OCPP protocol.
The standard format is:
VID:[MAC_ADDRESS]
Where MAC_ADDRESS is the vehicle's MAC address in hexadecimal format (12 characters, no spaces).
Example of an auto-charge identifier:
VID:A014310E004E
The supervision platform uses this virtual badge to identify the vehicle, verify its right to charge, and trace the charging session.
Creating the virtual badge for auto-charge
For the Chargekeeper supervision platform to automatically authorize a vehicle via auto-charge, you must create a virtual badge based on the vehicle's MAC address. This badge must follow a specific format and be correctly assigned to a vehicle.
1. General information
From the Badges menu, click Add a badge, then fill in the following fields:
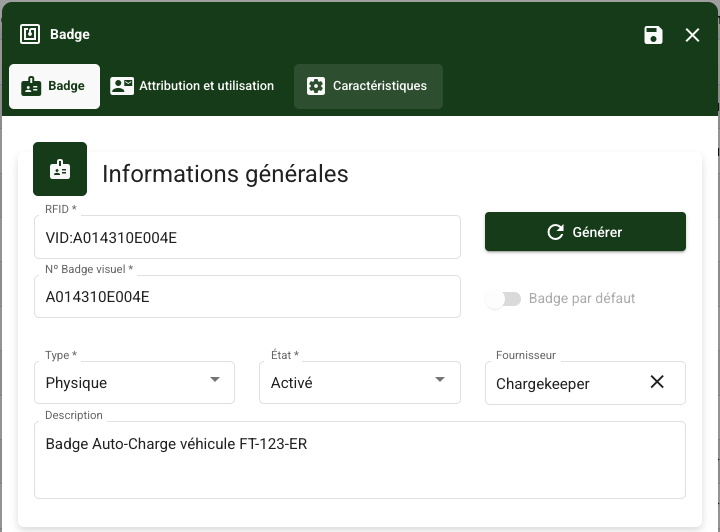
| Field | Expected value |
|---|---|
| RFID | VID:A014310E004E (prefix VID: followed by the vehicle's MAC address) |
| Visual badge no. | A014310E004E (often the same value as the RFID without the prefix) |
| Type | Physical |
| Status | Enabled |
| Provider | Entity that owns the badge or the charging station |
| Description | Recommended: for example Auto-Charge badge vehicle FT-123-ER |
The RFID field must imperatively begin with
VID:to be recognized as an auto-charge badge in Chargekeeper.
2. Assignment and usage
Next, go to the Assignment and usage tab to associate the badge with the right vehicle:
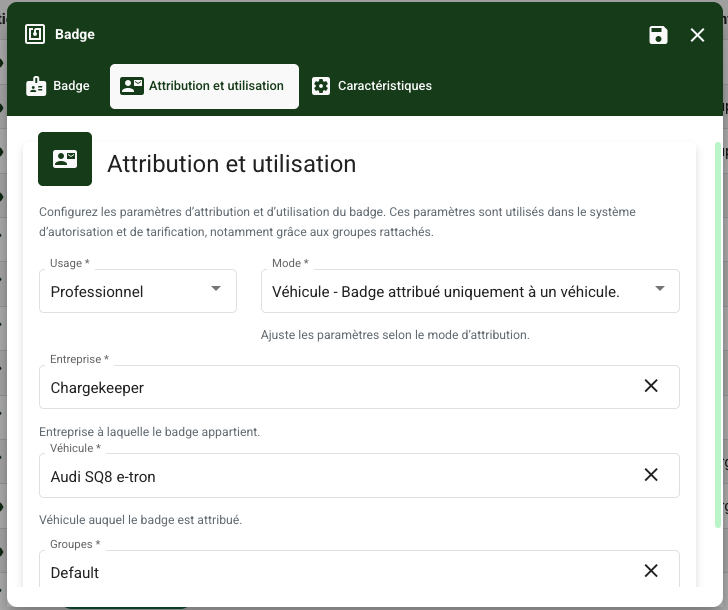
| Field | Expected value |
|---|---|
| Usage | Professional (or according to your usage policy) |
| Mode | Vehicle – Badge assigned to a single vehicle only |
| Company | The entity to which the vehicle belongs |
| Vehicle | Select the vehicle to associate the badge with |
| Groups | Associated authorization group, if needed |
Once this configuration is done:
- The supervision platform will automatically recognize the vehicle when plugged in thanks to its MAC address.
- If the charging station has auto-charge enabled, charging can start without manual intervention.
If you have any doubts about the badge format or the MAC identifier to use, please contact Chargekeeper technical support.
Activation on the charging station side
For auto-charge to work correctly, the feature must be enabled in the charging station's configuration.
Depending on the manufacturer, this activation may require:
- Enabling an option in the local configuration interface (via screen, firmware or software tool)
- Configuring one or more specific OCPP keys, defined locally or remotely from the supervision platform
Examples of OCPP keys related to auto-charge
| Manufacturer | OCPP configuration key | Recommended value |
|---|---|---|
| KEMPOWER | AllowedAuthenticationMethods |
rfid, evmac |
| DELTA | OCPP/idTagAutocharge |
VID:[ID] |
- For Kempower chargers, the
AllowedAuthenticationMethodskey must include theevmacmethod in order to allow automatic recognition of the vehicle via its MAC address. - For Delta chargers, the
OCPP/idTagAutochargekey lets you define the virtual badge format used to identify the vehicle. TheVID:[ID]format is required to ensure compatibility with Chargekeeper.
Note: these examples are provided for guidance only. The names and formats of the keys may vary depending on the models and software versions.
We recommend consulting the manufacturer's technical documentation or contacting their support to obtain the exact configuration compatible with auto-charge.
Benefits of auto-charge
- Time savings: no action required from the driver
- Traceability: each charge is associated with a known vehicle
- Security: only authorized vehicles can charge
- Automation: ideal for professional fleets
Prerequisites and configuration
To enable auto-charge on your infrastructure:
- Check hardware compatibility: DC charger + Combo CCS connector + OCPP 1.6 JSON
- Enable the auto-charge option in the charging station's configuration
- Register the vehicles'
VID:...identifiers in the Chargekeeper supervision platform - Verify that the charging station does send the
Authorizecommand with the vehicle's identifier
How to retrieve the identifier of an unknown vehicle (auto-charge)
If you do not know the MAC address of a vehicle to associate with an auto-charge badge, Chargekeeper lets you identify it from the supervision logs. Here is the complete procedure:
Steps to follow
-
Configure the charging station to run in auto-charge mode
- Enable auto-charge mode on the charging station via firmware or an OCPP key (see the "Activation on the charging station side" section)
- Make sure the charging station is properly connected to Chargekeeper and that it sends its OCPP requests.
-
Connect the vehicle to the charging station
- Plug an unknown vehicle into the charging station. The charging station will automatically attempt to start a charge via auto-charge.
-
Wait for the charge to fail
- The charge normally fails because the virtual badge (VID) corresponding to the vehicle's MAC address is not yet registered. This is expected.
-
Access the OCPP logs in Chargekeeper
- Go to the Logs menu.
- Filter the logs by:
- Name of the charging station used for the test
- Action: OcppAuthorize
-
Identify the failed entry
- You will see one or more lines with the Error status (authorization failure).
- Click on the relevant entry to open the details of the OCPP message.
-
Extract the auto-charge identifier
- In the message body, locate the
idTagattribute. It will contain the vehicle's MAC address, prefixed withVID:.
- In the message body, locate the
Example log
{
  "action": "OcppAuthorize",
  "status": "Rejected",
  "payload": {
    "idTag": "VID:A014310E004E"
  }
}
Need help?
If you have any doubts about the configuration or compatibility of your chargers and vehicles, our support team is at your disposal.
Contact us through your Chargekeeper interface or by email.
